I have already done 1:64 scale conversations but I wanted to build something truly from the ground up. This project was entirely designed in Rhinoceros 5 and aimed at the quickest print times with least amount of waste. I use a 4 channel FrSky receiver de-pinned, 20A speed controller, Turnigy 1440A servo, 130 size brushed motor, 3mm LEDs in red and yellow and finally a 3D printer!
This is a two part project, on this page we cover the build of the chassis and the shell, everything to get a rolling chassis going. In the second part I will cover the nano FPV install and what tires to use .. finally (I hope!)
STL files:
chassis-battery-tray-v2-c
steering-hub
truck-shell-split
wheels
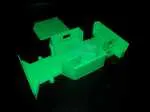
The 1:43 chassis is designed as a ground up print without supports or brim/raft making the print itself straight forward.
On earlier prototypes the wheel hubs ended up being too fragile. The upgraded hubs are much thicker and solid on the pivot.
The 130 sized brushed motor runs on a 8T pinion gear to a 54T sprocket gear.
The first attempt of printing the chassis in one piece ended up looking a mess. I changed the design to be printed in halves and again no supports are required.
The chassis printed at regular quality and turned out excellent. The top tray gets printed at the same time.
With battery tray in place secured via 4 bolts each 1mm diameter by 4mm long.
The speed controller is a 20A with forward / reverse. I cannot use it straight out of the box as the motor connection pins are on the top of the board.
I am using a Turnigy 1440A servo for the steering which sits in slots so it cannot move anywhere but up meaning it only needs glued down to secure it.
The motor sits at the back center to offset the weight in the center.
Always best to check everything fits in first!
Clearance comparison to the original conversation which only had 1.5mm clearance.
The new steering hubs are universal so do not need printed in pairs. They connect with a 1mm steel rod which can be switched out to various sizes to adjust toe in/out.
The speed controller is directly soldered to the de-pinned receiver as is the steering servo. The speed controller has two inputs:
JST & nano-tech plug. The RX has a small white 2 pin plug which is used to power LEDs and later FPV. To reduce the height of the speed controller I extended the motor connection out to the side using servo pins to plug into the original motor plug.
If FPV is not being used then a smaller shell could be made and use the internal battery tray.
The rear axle is 2mm hardened steel by 50mm length. I drilled a 0.8mm hole to mount the pinion gear in place with a M1 6mm bolt.
Axle sprocket fitted in place.
The original truck shell I designed failed due to trying to have it print upside down as one piece. I redesigned the shell with an FPV platform in the cabin area and in 2 pieces.
I used regular super glue to bond the two parts and give it a sanding. The main advantage to printing this way is the sides are super flat with no print layer lines.
Testing the shell on the chassis showed it doesn't need any mounting screws due to the exact fit it pushed on and stays there.
I used regular car bumper primer spray paint for the first layer in gray.
Next a band stripe around the back to the arches and a V pattern on the front grill leading over the cabin with a yellow trim line.
I finished the front area and front quarters in metalic blue to contrast against the white and painted the back area black before fully gloss coating the whole thing.
I got some yellow and white 3mm leds that run on 3-12v with an internal resistor so all I had to do was wiring them in parallel . The power line in gets split to a male servo plug which the FPV will later use for power. Now the shell has a constant 5v line on a detachable plug.
Printed decals on vinyl from Acrylic Craft that I requested printed.
Using a mirror to show all lights on ready to go.
All that is needed to complete the base model are tires which I'm still playing with but that'll be covered in part 2 with the FPV install!
 1:43 scale - 3D printed RC chassis for FPV micro racing - Part 1/2
 1:43 scale - 3D printed RC chassis for FPV micro racing - Part 1/2


