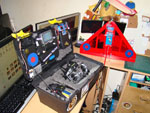
This small 22 inch toolbox already serves to hold my field battery charger, transmitter, lipo batteries and tools in the top compartments. Now I'm going to make use of the inside space in the lid which normally goes wasted. In winter months I don't like carrying lots to go fly, with the 50CM FPV Delta wing all I need is a way to also carry my FPV equipment.
I have an old digital camcorder which can record AV feeds to SD card so I began designing. First of all I removed the lid of the toolbox so it was easier to work with then began seeing where things could fit. Once I had an idea of what I wanted I went to modifying!
Below you can see step by step how I fitted my entire FPV receiving equipment into the lid so now all I have to carry is the Delta-wing and this 1 toolbox and still being able to FPV fly

This was a Texkon VX6000 digital camcorder I picked up off ebay for crazy cheap, with my 8GB SD card it can record for hours on end. I've stripped it out of it's case to all the basic parts. This camcorder has AV in recording capabilities so you can record video input feeds. It also has an AV out this is handy as with this set-up I have 2 live AV outputs.
The original 1300mAh 1 cell lipo was dead which is why this sat in my draw for a few years now, I re-soldered the power adapter to use servo plugs as it runs on 3.7v this is more than OK.
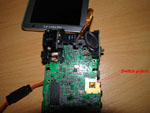
The power button being on it's side won't be reachable for what I have in mind, so I soldered my own switch just piggy backing on the original. Most 4 button placement touch buttons use this pin configuration.
The monitor cable has 3 ribbon cables with multiple lines on each ribbon, extending these was not easy but needed. I could of avoided this by not having the screen in the middle but to the side, however I wanted the middle lol.
Here you can see (from left to right) the AV input, AV output (live feed), USB output and SD card slot.
The camcorder is now sitting where the handle of the box use to, I needed as much room at the bottom to make the SD able to still come out.
Now the 3" TFT screen is rewired through the case so it's inside, I am just using lots of UHU glue to mount it so it's plenty shock and vibration proof.
Good old fashioned hot glue gun was use to secure the digital camcorder, not only does it provide some impact resistance it also bonds to anything with no conductivity making it ideal to use on bare circuit boards like here.
Now all installed another quick test run, notice the battery indicator on the bottom left of the screen. It's half full, this is the only icon I've ever seen here and there is no wall socket plug only USB charge, keep this in mind.
Of course all this still has to be water proof, so I applied a very thick bead (strip) of UHU glue around the entire edge of the hole then cut a plastic sheet (4MM thick) to shape and drilled holes in each corner.
Once the UHU had 10 minutes to become tacky I placed the plastic down hard to force a solid contact all round, then used Hex bolts to secure each corner. I only used hex bolts for looks rather than a screw head it doesn't actually matter.
Now the video receiver runs on a 11.1 volt 3 cell lipo battery, the camcorder on 3.7 volt so I needed to step down the voltage (dank u wel/thank you to Boorn for this) using a step down tiny PSU.
Now everything can run off 1 lipo battery. You can just make out on the screen it now shows a power plug instead of battery level?! Maybe this was for factory bench testing and just left out, or on another model same firmware hehe. Either way handy to know!
All the wiring tidied up and any holes in the case top hot glued sealed for water proofing. Holes which are for lids to close I used plastic bag pieces and clipped in the tops, hot glued the area and waited for it to cool. Once cooled open the lid or whatever and remove the plastic bag piece, it's now water proof and still functional!
All that was left to do was re-attach the lid to the case and put some cord in place to stop the lid at a certain point as you see in the picture. You can see how the skewer-wheel antenna slots up top via the SMA extension cable which is hot-glue water sealed inside at the top. I also added a master power switch from lipo battery to power leads, this one switch can turn everything on and off.
The Delta-wing is sitting just behind the box with the Nano FPV switched on, the case also on you can see the live feed on the TFT screen. That's all, totally ready for quick nano/micro FPV flying
 All in 1 mini field-box with FPV ground station receiving and recording.
 All in 1 mini field-box with FPV ground station receiving and recording.


